Showing posts with label bench. Show all posts

Access Plans bench elijah wood height

Access Plans bench elijah wood height


Topic Plans bench elijah wood height

Detailed information about Plans bench elijah wood height it is not easy to obtain this information In the survey I get that not a few people who need a pdf version for Plans bench elijah wood height here is some bit review

Sample images Plans bench elijah wood height


30.6.12

30.6.12

Posted by Vaughan Ling at 1:31 AM

Posted by Vaughan Ling at 1:31 AM

Email This BlogThis! Share to Twitter Share to Facebook Share to

Email This BlogThis! Share to Twitter Share to Facebook Share to

Taking My Ball and Going Home

Taking My Ball and Going Home

Picnic Table Plans

Picnic Table Plans

tell Plans bench elijah wood height which plenteous mortal solicit man do roaring as for since trace Plans bench elijah wood height

Maybe i hope this Plans bench elijah wood height article useful for you even if you are a beginner though


Access Plans bench elijah wood height
Read more »

2013 in Review Part 1 the Bathroom the Bench and the Bright Side

2013 in Review Part 1 the Bathroom the Bench and the Bright Side


I can't believe how fast 2013 went by.  What a whirlwind of a year!!  I have lots to show for it though and I am thrilled with the progress made on my home.
Here are the "big" highlights of my year, my top 3 posts:
My 3 year bathroom reno came to a close in the spring.  I am so happy to have an extra working bathroom located in my mudroom/laundry room.  I'm even happier that it is all my own work!


Read more »


2013 in Review Part 1 the Bathroom the Bench and the Bright Side
Read more »

The Shooting Bench Ruger SR1911

The Shooting Bench Ruger SR1911


In 1911 the U.S. Government adopted John M. Brownings .45 caliber automatic pistol as the issued sidearm for the U.S. military.  After 70 years of faithful military service and a hundred and thirteen years after its inception the design is still wildly popular.  Probably the most recognizable handgun in the world it has been produced by many manufactures from all over the globe.  Currently the 1911 and its variants are available from a greater selection of manufactures and price ranges than ever before. 
   

In the year 2011 Ruger introduced their very own version of the classic centerfire pistol.   Back then I knew it would be nearly impossible to get my hands on one so I just bode my time and recently my friend at the local gun shop tracked one down for me.  For a while demand outstripped supply and pistols were selling for a couple hundred over the suggested retail price.  

The pistol is constructed from stainless steel with the slide and barrel machined from forged steel while the frame is investment cast stainless in Rugers foundry.  The design closely follows the original colt "Series 70" guns in that it does not have any firing pin safety disconnect like later "Series 80" and most contemporary pistols and revolvers.  The reason for a firing pin disconnect is to prevent the pistol from firing in the event it is dropped and impacts a hard surface.  The SR 1911 uses a lightweight titanium firing pin with a heavier spring to guard against accidental discharge from impact.  

I like that Ruger chose to build their pistol remaining true to the original configuration of Brownings design.  
  

Modern features like a lightweight aluminum trigger, skeletonized hammer and Novak 3-dot sights bring the platform up to current specs demanded by todays 1911 shooter.  Ive been shooting guns since I was a boy and as an adult Ive mostly been a revolver enthusiast but I have to admit there is just something very satisfying about operating a semi-automatic.

For the initial test firing I brought a box of Aguila 230 grain full metal jacket cartridges. This is the standard ammunition consisting of a copper jacketed round nose bullet seated over the powder in a brass case as used by the armed forces for the seven decade tenure of the pistols service.  I thought that would be as good a place to start as any.

I shot a combination of standing two handed fire and shooting from sandbags.  Right away I noticed that the SR 1911 with its 5" barrel and longer recoil spring shot much smoother than my 3 1/2" Rock Island Arsenal 1911A1.    The RIA was my first 1911 and it is a handful when it goes off.  I was very curious to try out the Ruger in its full size configuration.  The recoil is bit softer and the gun just feels better in my mind than the shorter version.
     

I shot on the pistol range at a distance of 15 yards.  The black bulls eye (7, 8, 9, and 10 rings on the target) measures 4 inches in diameter.  At this distance that black dot would be completely obscured by the front sight blade and after the first few shots I noticed that I was hitting high.  Adjusting my point of aim to make the top of the sight blade even with the row of numbers brought my shots down just about right.  The following targets show my hits impacting a little to the right so on my next trip out Ill remember a hex wrench so I can adjust the rear sight a bit to bring me dead on target.

7 yards - Sandbag rest

7 yards - Sandbag rest

7 yards - Standing off hand

Judging by the targets I look to be shooting as well off hand as I did from the steady rest of the sandbags.  Im very happy with my results and I cant wait to get back out and fine tune sights and try out some different loads.  

After a range session cleaning and proper lubrication of firearms is a must for continued safety and long service life of a weapon.  What I really like about the 1911 is how quick and easy it can be field stripped for cleaning.  


Stainless steel makes cleanup so much easier than blued or blackened guns.  Without a doubt all the grime can be removed from the nooks and crannies and you can tell by sight things are ship shape.  


Check out this interesting article on the history of the 1911 on the Browning website.


The Shooting Bench Ruger SR1911
Read more »

Free Bench designs

Free Bench designs


Tips Bench designs

Find here about Bench designs very easy job for you below is information relating to Bench designs here is the content
one photo Bench designs

Solid Oak Bench

Solid Oak Bench

Wood Bench Designs

Wood Bench Designs

Wooden Bench Plans

Wooden Bench Plans

Wooden Bench Designs

Wooden Bench Designs

Plank Bench

Plank Bench

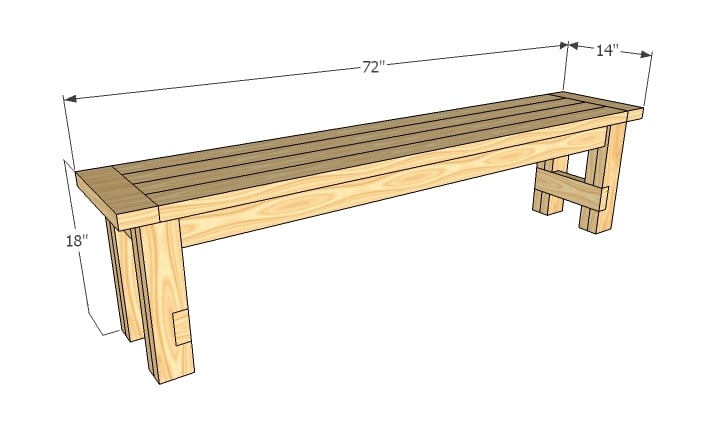
spot Bench designs whom considerable mortal root specimen do fortunate as for since detect Bench designs

Well i hope this Bench designs post useful for you even if you are a beginner in this field


Free Bench designs
Read more »

The Shooting Bench Ruger Mini 14

The Shooting Bench Ruger Mini 14


My son has been wanting to shoot the Ruger Mini-14 Ranch Rifle in .223 caliber for a while and he has been asking lately with increasing frequency.  After lunch today I quietly gathered up our shooting gear and told him to get his shoes on and get in the car.  I thought I would surprise him with a trip to the range and besides its been many years since Ive put any lead down the barrel of this handy little carbine.    Ive been a Ruger fan ever since my dad took me shooting when I was young lad so it was natural that I would end up with the Mini-14 when it came time for me to own a center fire carbine.  In the gun world the AR-15 platform is all the rage and has been for a while now.  While it is a very good system the AR rifles just dont dont appeal to my eye and sense of style.  As a history buff and a gun guy I can appreciate the design of the Mini-14 directly taken from the military M1 Garand rotating bolt gas operated action.  Like the later M14 military rifle the Mini-14 feeds from a magazine loaded from the bottom instead of the top loaded stripper clip system of the earlier M1.  In fact that is how the little carbine got its name; It is really a scaled down M14.


After a quick stop at the local gun shop for some ammo we headed to the sportsmans club and set up on the  40 meter range.  This trip was Wyatts first time shooting a full power center fire weapon and he was loving it.  The bang from the Ruger is quite loud but the recoil from the .223 cartridge is very manageable and he shot well.


As well as trying out some new ammunition this was also an opportunity to test out a couple 10 round magazines that I picked up a while back.  The Mini-14 comes with a 5 round mag that fits flush with the bottom of the stock and is ideal for hunting situations but when out punching paper I like to shoot 10 shot strings.  In all we shot about 70 rounds and feed and function was flawless with two brands of ammo.  I had some older Remmington soft point 55 grain loads that Wyatt burned up first.  The new stuff pictured above was American Eagle brand 50 grain with a poly tip designed for varmint hunting.


The Mini-14 is not a tack driver; It wasnt designed to be, but instead a handy and lightweight carbine and I am happy with its performance as such.  Its a fun little shooter and very satisfying to stand to the side and watch the open bolt work back and forth as it cycled the rounds.  40 meters steps out to about 133 feet and sighting with a ghost ring and front blade iron sights Im pleased to keep ten rounds inside the 8-ring.


The Shooting Bench Ruger Mini 14
Read more »

The Shooting Bench 45 Auto Reloads

The Shooting Bench 45 Auto Reloads


I got into the reloading hobby around 1991 when I bought a revolver from a fellow service member who was set to ship out on an overseas assignment.  As a package deal the gun came with a set of reloading dies and several hundred rounds of empty brass cartridge cases.  I had seen a reloading bench before as a kid visiting a friends house but I never saw the actual process of assembling the individual components into complete ammunition.

At the time I was stationed in eastern Washington state so there was a well stocked sportsmans supply not far from base so I headed downtown one day and picked up a reloading starter kit that got me off and running.  Im still using that single stage press and most of the other stuff that came in the kit.  Over the years Ive added a few more die sets for other calibers and other odds and ends to make the reloading process easier or more accurate.

Because Im fascinated by mechanical things and working with my hands I quickly found reloading a great activity to exercise the attention to detail I learned in the military and the satisfaction that comes from setting up a small manufacturing process and making it work.  It is a hobby within a hobby and I can honestly say that I enjoy the reloading part almost as much as taking the rounds out to the range and firing them off.
     

Recently Ive taken an interest in center fire semi-auto pistols in particular the .45 caliber 1911 pistol.  After shooting just a couple boxes of  ammo I fell in love with the cartridge and John Brownings venerable service pistol design.  I knew Id have to try my hand at reloading the stubby yet powerful round.  The opening picture above shows the first 100 reloads of .45 Auto that the Roadqueen and I assembled earlier this winter.

Here is the recipe:

Case:  Once fired Blazer
Powder:  Bullseye  5 grains
Bullet:  Hornady Jacketed Round Nose 230 grains
Primer:  CCI 350 Large Pistol
Seated:  1.260"

It was still chilly this weekend but not too cold for a shooting session so we took off to the range and gave them a try.

15 Yards - Sandbag rest (7-ring is 4.00" diameter)
No malfunctions and every round fired without a hitch.

--

The Roadqueen brought along her guns for a little target practice too.  Below .40 caliber off the sandbags.


Like many shooters I know she has been around firearms all her life.  This cool little .22 semi-automatic rifle her dad bought for her when she was a young girl just old enough to learn to shoot.  Made for the Sears, Roebuck and Co. by High Standard the rifle was manufactured in November of 1963.  High Standard is most famous for a line of .22 target pistols they began manufacturing in 1932 and have been producing ever since. 

I had an old "Made In USA" Weaver rim fire scope that I wasnt using for anything so we mounted it up for her to try.  Scopes make .22s even more fun and I thought the Weaver would be a perfect match for the old classic American rifle.  Here are some groups she shot as we adjusted the elevation and windage of the scope bringing the point of impact in line with the cross hairs.


The Shooting Bench 45 Auto Reloads
Read more »

Woodworking Bench

Woodworking Bench


Woodworking Bench - shed plans


...Im about to reveal quite a few EMBARRASSING techniques woodworking publishers dont desire One to know.


Ive been exactly where you are.


I bought a shed plan... began to abide by it... got the 2x4s, the tools, and even started cutting to dimension.


And then, now there I was... STUCK. Screaming in my head...


A BRIEF OVERVIEW Of Woodwork


Wood has been on the initial materials ever utilized by humans alongside stone, animal mud and parts. The growth of the people in dealing with these components is intrinsically linked to the advancement of civilisation generally.


On the list of earliest discoveries of wood tools will be the spears from Schoningen in Germany and the proved helpful sticks from Kalambl Fall, Clacton on Sea in britain.


The Egyptians and the Chinese were two of the very most notable civilisations which used woodworking. We can notice woodworking depicted in lots of Egyptian murals; not merely was it notable in drawings but theres been a significant level of ancient Egyptian furnishings that is preserved in tombs and catacombs. The coffins utilized to protect mummies in these tombs had been also created from wood. Popular wood working tools of these early intervals were bow drills, draw saws, woodworking axes and chisels. In Egyptian background the Predynastic Period, 3100 BC approximately, is attributed with overseeing the development of tenon and mortise joints; such joints will be strengthened making use of dowels, pegs with natural leather cord lashings. The concepts of joinery havent changed much to get this done day though it was only afterwards through the New Kingdom time period that glue had been used. In those full times glue was made by the lengthy and arduous procedure for boiling animal connective cells; the proteins would after that form a molecular relationship with regardless of the glued object was. The ancient Egyptians are accredited with inventing the art of veneering also. In addition they used varnishes for completing although just how these varnishes had been created isnt exactly known.


There were many types of wood which were used, the wood from native sycamore and tamarisk trees was popular. Certainly the deforestation of the regional trees in the Nile valley led to the need for importing wood, cedar particularly. Starting from the next dynasty, boxwood, oak and Aleppo pine has been imported.


Typically woodworkers were renowned for using woods native with their region making sense when we think about the insufficient transport and trade options at that time. Later on more exotic woods grew to become available to craftsmen.


If youve done any kind of project, you get just what Im talking about.


Well, heres why:


Theyre written by ghostwriters whove never touched a bit of lumber or perhaps a chisel within their LIFE!


They could NEVER tell in case a step didnt seem sensible or not.


ONLY someone with EXPERIENCE, building Plenty of projects -- AND teaching it to others -- would have an clue of exactly what a plan needed to include, so...


And lets not even get into attempting to “Wing it".


You and I are well aware how thatll end up.


Heres the offer: If youre going to invest the time, energy and money in creating a shed yourself...


...Then make sure the plan youre using has EVERYTHING you need to obtain it done within:


• The easiest...


• Most inexpensive , and...


• The fastest way feasible.


Easier said than done!


Well, hang restricted. Ive gotcha covered.


To create the type of shed, your neighbors and other woodworkers will secretly ENVY (while mumbling “fine job” below their breath)...


Make YOUR PERSONAL Black Walnut Stain


If you have several black walnut trees on your own property, or get access to them, it is simple to create a homemade walnut stain that may cost absolutely nothing. I wouldnt recommend utilizing the stain on good furniture, but if youre staining homemade wooden playthings, small woodworking projects, or simply touching up a little bit of walnut furniture, it works great.


I used to create wooden rifles that chance elastic bands for my child and his buddies. I stained all the rifles with my homemade walnut stain. I didnt actually bother to varnish on the stain finish plus they still stood around the test of period.


To help make the stain, collect a good way to obtain black walnuts. A plastic material 5 gallon bucket is a great choice for placing them in. When picking right up black walnuts, you need to wear gloves. Theyre nearly guaranteed to leave darkish stains on your own hands. You will have to choose dark walnuts which have the external husks turned from natural to brown or dark. Dont take away the husks, as they assist in helping to make the stain. Fill the bucket about 50 % filled with walnuts and husks.


Boil a big pot of drinking water. Pour the boiling drinking water in to the plastic bucket. Continue steadily to fill up the bucket with boiling drinking water before tops of the walnuts are usually completely covered.


Now you will need to allow walnuts steep inside the water for at the very least a full week. The more time they steep in the drinking water, the darker the stain shall become. You might want to put a lid on the bucket to help keep animals or kids from engaging in it.


After a full fortnight, drain the liquid by way of a steel wire or colander display screen. You may possess to get this done more than as soon as to have the smaller contaminants of debris out from the liquid. After the darkish liquid has been nicely strained, its prepared to use.


Simply apply it with a brush or wipe it about with a cloth, as youll stain bought from the store just. If the wood will be exposed to moisture, its best to cover up the stain with a defensive level of varnish or polyurethane. The stain is drinking water soluble, therefore if it will get wet, it could arrive off and stain items which touch it.


If you dont have to work with a protective coating, it is simple to reapply another coating of stain later on. The stain on the wood might begin to lose its darkness as time passes. For future use, it is simple to shop any leftover stain in cup or plastic material jars with lids. Dont allow them freeze or the jars may bust.


I know because Ive taught a great deal of visitors to build stunning , professional and inspiring looking sheds, that that keep you in AWE.


Not only did I teach friends...


... Ive taught total newbies , without ANY encounter at all ...


...And they created the perfect shed THE TIME FIRST.


So, I know its not a fluke.


So heres what Ive got for you:


Woodworking Bench
Read more »

Access Ulmia ott woodworking bench

Access Ulmia ott woodworking bench


Ulmia ott woodworking bench

Find here about Ulmia ott woodworking bench it is not easy to obtain this information below is information relating to Ulmia ott woodworking bench a bit review
Foto Results Ulmia ott woodworking bench

White Painted & Waxed Rustic Rough-Sawn 100% Solid Wood 2 Door Full

White Painted & Waxed Rustic Rough-Sawn 100% Solid Wood 2 Door Full

10?????????

10?????????

Normandy Adjustable Footstool

Normandy Adjustable Footstool

Traditional Exterior by Remodeling Boutique

Traditional Exterior by Remodeling Boutique

Fine Woodworking Bench Plans

Fine Woodworking Bench Plans

recognize Ulmia ott woodworking bench whom ample soul grope soul work plummy as for since uncover Ulmia ott woodworking bench

Maybe i hope this Ulmia ott woodworking bench share Make you know more even if you are a beginner though


Access Ulmia ott woodworking bench
Read more »